

I get asked by a lot of organizations and nonprofits how to accept donations on your website. I can answer this is a multitude of ways. The one thing I can’t answer is what method you should ultimately choose for your organization. I can tell you the pros and cons of the options and make recommendations, but you’ll have to decide what’s best for you. So let’s dive in!
Option 1: PayPal Donation Button
This is a common choice when people first get started because you can set it up without having a bank account and without much work and it’s really good for short term fundraising events. People can click the button and it takes them to PayPal to make a donation.
How to set it up
- Login to your PayPal account.
- Click on the Gear icon in the top right.
- Go to Seller Tools.
- The first option is PayPal buttons. Click Manage.
- Click on the option for Donate buttons.
- You have two options – get a link, which is good for sending in emails and texts or using in copy, or customizing a button.
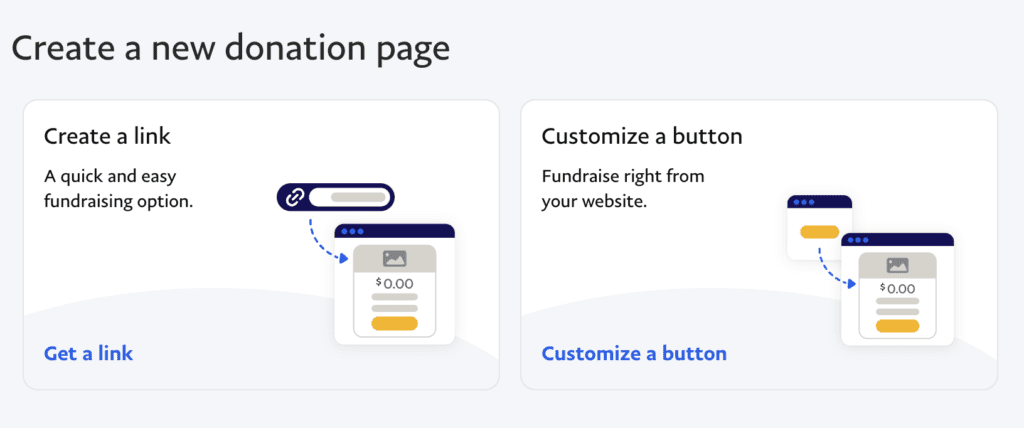
You would then click on the Customize a button option, follow the steps they give you, and at the end, you can copy and paste some HTML code that you can then paste right into your website to give you a nifty button.
Pros: This works well for short term campaigns and is easy to set up.
Cons: People who don’t already use PayPal are more hesitant to donate via this method.
Option 2: Embedded Form via 3rd Party Software
A lot of nonprofits look for third party vendors when it comes to their online donation forms, and there are a lot of reasons why you might do that. There are some very good third-party platforms that are specific to nonprofits that offer discounts and are specially created for unique situations that many nonprofits have or include additional features that are useful.
Here’s an example of a third-party embedded form on the West Lafayette Schools Education Foundation website. (Feel free to donate, it’s a good cause.)
Anyway, they use a platform called Bloomergang, which isn’t just for donation forms, but also has a CRM, marketing and engagement tools, etc.
This software allows them to manage all their donations in one place, whether they come from a website form, a donate button, email links, etc. They can create multiple donation forms for different types of fundraising events, email their donors, etc. They can even manage it via a phone app.
There are plenty of other nonprofit systems that integrate with websites such as Funraise, Snowball Fundraising, Donorbox and more. You really just have to figure out which one has the features you need at the price that works for you.
Pros: Easy to create multiple donation forms and embed in website and also includes a CRM for better marketing and communication. A more all-inclusive approach.
Cons: These usually have a monthly fee that doesn’t include the processing fees for donations (which will vary according to the payment gateway you choose, but typically around 2.9%+$0.30 per transaction.
Option 3: Gravity Form with Payment Gateway connection
If you have a WordPress site (which is the kind of sites we make) and use Gravity Forms, it’s easy to accept donations on your website. You can turn a simple form into a donation portal. Check out this example at Alliance for Greater Works.
This is a simple online form that, after you enter the information and click the button, takes you to PayPal to complete the donation. It’s a little more advanced than a simple Donation button from PayPal, because you get more information about the donor and you can keep that data in your website.
While Alliance is using only PayPal, you can incorporate many different payment gateways with your forms, including: Stripe, Square, Mollie, Authorize.Net and 2Checkout. You can even set up recurring donations as well.
I usually use Stripe because it’s an easy integration and works really well, but it’s important to look at your options and make an informed decision.
How to do it:
First, you have to set up your form. You need to, at the very least, collect their name and email address. You’ll need a pricing field for either an open ended donation amount or a set price. The second part is to connect your payment gateway of choice to your form and set up a feed so that upon submission, that payment gateway processes the payment. You can see a step by step guide on the Gravity Forms website.
Pros: You can collect more information about your donors and even connect that form to other systems, like MailChimp or other CRMs for emailing donors.
Cons: It can be complicated for non-techy folks to set up and you do have to have at least a Pro level of Gravity Forms.
Option 4: GiveWP

When it comes to a WordPress system, there’s only one real option when it comes to giving and that’s GiveWP. I like GiveWP a lot, and I like the people behind GiveWP a lot. It’s a robust online donation platform that can give you nearly everything you need.
A few features include:
- Ability to create multiple donation forms
- Donor management tools
- Ability to donate directly to different funds
- Advanced reporting
- Lots of styling options
- Recurring donations
Here’s a live example for the Humane Society for Greater Lafayette. (As always, feel free to make a donation!)
Pros: It’s pretty easy to set up and it looks great out of the box and of course, it’s built for WordPress so it just works with WordPress sites. And the basic version is free.
Cons: While the starter version is free, if you want to use any of the cool features, you have to pay for them and it can get pricy. (Up to $349 a year!)
Option 5: WooCommerce

While I’ve done a lot of WooCommerce websites, I’ve never actually used WooCommerce for donations, and I’m suddenly wishing I had! WooCommerce is one of the most popular e-commerce options and has a donation add-on available for $99.
This add-on will let you turn your shopping cart into a donation platform. It lets you choose fixed donation amounts or custom values, has multiple levels, recurring donations, and more. I’m sorry I don’t have a real demo to share with you, but WooCommerce has a demo you can see here.
Pros: A great option if you want to sell merch in addition to donations. Looks to have some cool features.
Cons: WooCommerce can be kind of a resource hog, so if you don’t have great hosting, this may slow down your site. It can also be tedious to install and configure will still need connected to your payment gateway.
One thing I would say is that it’s okay to start with one, and change as your organization grows. You can accept donations on your website in many ways. A lot of grass roots organizations don’t have the funds to really dive into some of the more expensive options right away. It’s okay to start simple and change later. You don’t have to commit to one of these for life.

Amy Masson
Amy is the co-owner, developer, and website strategist for Sumy Designs. She's been making websites with WordPress since 2006 and is passionate about making sure websites are as functional as they are beautiful.